Wednesday, April 20, 2011

Unnecessary Code Detector (UCD)

I'm currently working on a couple of years old Spring-based Java application. The application is developed and extended by multiple developers, which is clearly visible in the code. I'm responsible for a feature change that is going to have a big impact on the code.

An important step before implementing the new feature, is to refactor the relevant parts of the application in order to make the change easier to implement (and more understandable).

I noticed that parts of the code or modules are probably not used anymore. To make the refactoring process easier and more effective, it's probably a good idea to locate and remove dead code. Refactoring dead code is a waste of energy! I've found an Eclipse plugin in the Eclipse Marketplace called Unnecessary Code Detector, which helps me locating dead code.

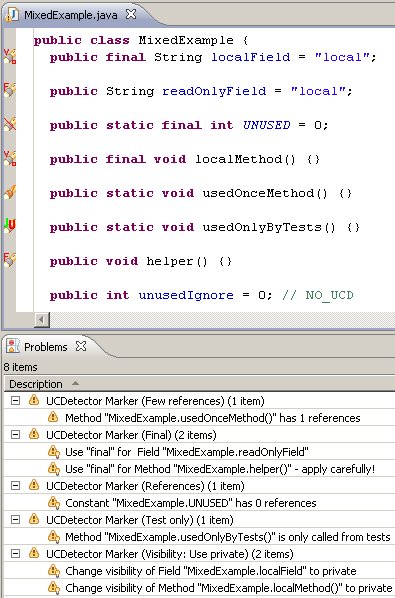
A first run of UCD results in a bunch of markers on code locations, where UCD thinks the code is unused. It also places markers on locations where the "visibility" of variables and methods could be improved.

The tool enables me to quickly find classes and methods with no references. I always do a double check with a "text find" on the whole project, to make sure the code is really not used. Because I'm using Spring, some of the classes are only referenced and used in the XML file. This type of reference is not detected by UCD, and it results in false positives. I annotate these locations with @SuppressWarnings("ucd"), which will stop UCD from marking them as unused code in the future.

In my opinion, Unnecessary Code Detector is a very valuable tool for the Java Developer. Give it a try!

Sunday, April 17, 2011

Java Management Extensions (JMX) and Spring

The Java Management Extensions (JMX) API is a standard for managing and monitoring applications and services. We will skip all the theory, and go right into developing a JMX bean that is partly exposed to JMX. Using JMX tools we can manage and monitor the bean.

This blog post shows how to create a bean, which has a normal interface and a custom restrictive interface for JMX.

The Java interface below defines a class with three methods. The first two methods are setters and getters of an attribute.


package com.javaeenotes;

public interface Example {
public String getAttribute();

public void setAttribute(String s);

public void hiddenOperation();
}


Take this interface and develop a class with some extra methods.


package com.javaeenotes;

public class ExampleImpl implements ExampleMBean, Example {
private String attribute = null;
private int attribute1 = 0;
private String attribute2 = null;

// Not exposed to JMX.
public String getAttribute() {
return attribute;
}

// Not exposed to JMX.
public void setAttribute(String s) {
attribute = s;
}

// Exposed to JMX.
public int getExampleAttribute1() {
return attribute1;
}

// Not exposed to JMX.
public void setExampleAttribute1(int i) {
attribute1 = i;
}

// Exposed to JMX.
public String getExampleAttribute2() {
return attribute2;
}

// Exposed to JMX.
public void setExampleAttribute2(String s) {
attribute2 = s;
}

// Not exposed to JMX.
public void hiddenOperation() {
;
}

// Exposed to JMX.
public void operation() {
;
}
}


Some of them are meant to be exposed to JMX, which means they can be monitored and manipulated. Now, define an interface to be used by JMX. The interface must follow the MBean conventions. This means we use getters and setters for attributes we want to expose. We leave out setters if we want to make the attribute read only. We also define operations for JMX.


package com.javaeenotes;

public interface ExampleMBean {
public int getExampleAttribute1();

public String getExampleAttribute2();

public void setExampleAttribute2(String s);

public void operation();
}


Lastly, we configure all of this in a Spring beans XML file. We use the class MBeanExporter to expose our bean to JMX. We also tell it to use the restrictive MBean interface for our bean.


<?xml version="1.0" encoding="UTF-8"?>
<beans xmlns="http://www.springframework.org/schema/beans"
xmlns:xsi="http://www.w3.org/2001/XMLSchema-instance"
xsi:schemaLocation="http://www.springframework.org/schema/beans
http://www.springframework.org/schema/beans/spring-beans-2.5.xsd">

<bean id="exporter" class="org.springframework.jmx.export.MBeanExporter">
<property name="beans">
<map>
<entry key="com.javaeenotes:name=exampleBean" value-ref="exampleBean" />
</map>
</property>
<property name="assembler">
<bean
class="org.springframework.jmx.export.assembler.InterfaceBasedMBeanInfoAssembler">
<property name="managedInterfaces">
<value>com.javaeenotes.ExampleMBean</value>
</property>
</bean>
</property>
<property name="autodetectModeName" value="AUTODETECT_MBEAN" />
</bean>

<bean id="exampleBean" class="com.javaeenotes.ExampleImpl">
<property name="exampleAttribute2" value="a value" />
</bean>
</beans>


To get all of this working as a demonstration, we're going to use the following Main class.


package com.javaeenotes;

import org.springframework.context.support.ClassPathXmlApplicationContext;

public class Main {

public static void main(String[] args) {
new ClassPathXmlApplicationContext(new String[] { "beans.xml" });

try {
Thread.sleep(10000 * 100);
} catch (InterruptedException e) {
e.printStackTrace();
}
}
}


Now, it's time to run this in our IDE. Or you can export it as runnable JAR, but make sure you place the beans.xml file in the same directory as the JAR-file.

After we run it, we're going to use the jconsole tool to lookup our bean. The tool can be found in the bin directory of your JDK installation directory. The screen below is presented to us, after we fire up jconsole.


Select our Main class and click on Connect, which will take us to the overview screen. Now select the MBeans tab, to find our bean.


Browse the directory tree to get the details of our bean. We can use it to view the values of the variables. We can even call the exposed methods of the bean. Try it!

This is a very, very short tutorial to get it working. Please use the following links to get more detailed information about JMX.

Saturday, April 2, 2011

Google Guice

As a developer and designer, you want to reduce static dependencies between classes. Whenever you need an instance, you still have to refer to the real class in order to get an instance of the implementation.

ExampleInterface object = new ExampleImpl();

We are only interested in the interface, so we want to avoid having to know the real implementation class. We can use a Factory Method design pattern to achieve this. Using this design pattern, we centralize and hide the implementation class in the factory class. This enables us to vary the implementation if needed. This is particular useful, when using mock objects for testing the application. Using Factory Methods reduces coupling and increases modularity.

public class ExampleFactory() {
public ExampleInterface getInstance() {
return new ExampleImpl();
}
}

The factory is commonly implemented as a Singleton.

A better way to couple objects together, is to use Dependency Injections. In JEE, this is available in a container for container managed classes. In the example code below, the container will automatically create and set a resource instance of the desired class.

public class Client {
@Resource
private ExampleInterface instance;
}

In other classes where container Dependency Injection is not possible, we can pass the implementation to the client class by using its constructor.

public class Client {
private ExampleInterface instance;

public Client(ExampleInterface instance) {
this.instance = instance;
}
}

The problem here is, that we need the implementation class whenever we instantiate the client class. This ties our implementation class to every location where we instantiate the client class, which we really want to avoid.

In this blog post, we'll use Google Guice to leverage Dependency Injection in the rest of our code. In order to use Guice, we need a class that maps interfaces to their implementation. The class has to extend AbstractModule provided by Guice.

public class ExampleModule extends AbstractModule {
@Override
protected void configure() {
bind(ExampleInterface.class).to(ExampleImpl.class);
bind(AnotherClass.class).to(AnotherInterface.class);
}
}

Now, we can use the @Inject annotation in places, where we need the implementations of mapped interfaces. The class below shows how.

public class ExampleClient {
// Attribute Injection
@Inject
private ExampleInterface instance;

// Constructor Injection
@Inject
public ExampleClient(ExampleInterface inst1) {
...
}

// Method Injection
@Inject
public void ExampleMethod(ExampleInterface inst2) {
...
}
}

Now, when we instantiate the client class, we let Guice to instantiate it.

Injector injector = Guice.createInjector(new ExampleModule());
ExampleClient client = injector.getInstance(ExampleClient.class);

Guice will create and inject the dependencies before returning the client class.

We can also use the injector as a factory.

ExampleInterface instance = injector.getInstance(ExampleInterface.class);

A complete example application can be found below. Make sure the following JAR-files are included in your build path when compiling the example:

  • guice-3.0.jar
  • javax.inject.jar
  • aopalliance.jar

ExampleClient.java

package com.javaeenotes;

import com.google.inject.Inject;

public class ExampleClient {
// Attribute Injection
@Inject
private ExampleInterface instance;

// Constructor Injection
@Inject
public ExampleClient(ExampleInterface inst1) {
inst1.method("Constructor is successfully injected.");
}

// Method Injection
@Inject
public void ExampleMethod(ExampleInterface inst2) {
inst2.method("Method is successfully injected.");
}

// Used to test Attribute Injection
public void testAttribute() {
instance.method("Attribute is successfully injected.");
}
}

ExampleImpl.java

package com.javaeenotes;

public class ExampleImpl implements ExampleInterface {

@Override
public void method(String s) {
System.out.println(s);
}
}

ExampleInterface.java

package com.javaeenotes;

public interface ExampleInterface {
public void method(String s);
}

ExampleModule

package com.javaeenotes;

import com.google.inject.AbstractModule;

public class ExampleModule extends AbstractModule {
@Override
protected void configure() {
bind(ExampleInterface.class).to(ExampleImpl.class);
}
}

GuiceDemo.java

package com.javaeenotes;

import com.google.inject.Guice;
import com.google.inject.Injector;

public class GuiceDemo {

public static void main(String[] args) {
Injector injector = Guice.createInjector(new ExampleModule());

System.out.println("Getting instance using injector as a factory.");
ExampleInterface instance = injector
.getInstance(ExampleInterface.class);
instance.method("Test instance returned by injector.");

System.out.println("Getting injected client.");
ExampleClient client = injector.getInstance(ExampleClient.class);
client.testAttribute();
}
}