I came across a nice complete article about Java Concurrency:
Introduction to Java Concurrency / Multithreading
Well written by Jakob Jenkov.
Tuesday, June 28, 2011


Sunday, June 5, 2011
Short introduction to jMock
The jUnit framework is a great tool for testing your Java application. But writing test cases can be complex. Especially when the object under test is dependent on several other objects, which in turn depend on other objects. This means the whole dependency graph has to be created before the test can be executed. Building this graph can be complex, and error-prone.
Luckily for us, there exists a framework called jMock. jMock enables you to create mock objects that mimic behavior of dependent objects. We can configure the expected interaction and behavior of these objects.
Let's start with an example class we want to test:
The class is dependent on a class with the following interface:
The interface specifies a method that returns a String. The actual implementation of this interface is not required for jMock. jMock uses the interface to create an object with the same interface you can use in your test cases.
An example test case:
In this test case, we create the object under test with a mock object. The expected interaction and behavior is then configured. First, the method() method is called, which then returns a string value "hello". Other interactions, like calling the same method twice, will result in an error.
As you can see, jMock is a very valuable extension to the jUnit framework, which makes writing test cases much easier.
Links:
Note: when running jMock in Eclipse, the following error can occur when running test cases:
The solution is make sure the jMock libraries are included before the standard jUnit libraries in the build path.
Luckily for us, there exists a framework called jMock. jMock enables you to create mock objects that mimic behavior of dependent objects. We can configure the expected interaction and behavior of these objects.
Let's start with an example class we want to test:
package com.javaeenotes;

public class TestSubject {
    private DependentClassInterface depObject;

    public TestSubject(DependentClassInterface depObject) {
        this.depObject = depObject;
    }

    public String method() {
        return depObject.method();
    }
}
The class is dependent on a class with the following interface:
package com.javaeenotes;

public interface DependentClassInterface {
    public String method();
}
The interface specifies a method that returns a String. The actual implementation of this interface is not required for jMock. jMock uses the interface to create an object with the same interface you can use in your test cases.
An example test case:
package com.javaeenotes;

import static org.junit.Assert.assertTrue;

import org.jmock.Expectations;
import org.jmock.Mockery;
import org.junit.Test;

public class TestSubjectTest {
    @Test
    public void testMethod() {
        Mockery context = new Mockery();
        // Create mock object.
        final DependentClassInterface depObject = context
                .mock(DependentClassInterface.class);

        // Test object is instantiated with mock object.
        TestSubject testSubject = new TestSubject(depObject);

        // Configure expectation and behavior.
        context.checking(new Expectations() {
            {
                oneOf(depObject).method();
                will(returnValue("hello"));
            }
        });

        // Test outcome.
        assertTrue(testSubject.method().equals("hello"));

        // Check if expectations are satisfied.
        context.assertIsSatisfied();

  }
}
In this test case, we create the object under test with a mock object. The expected interaction and behavior is then configured. First, the method() method is called, which then returns a string value "hello". Other interactions, like calling the same method twice, will result in an error.
As you can see, jMock is a very valuable extension to the jUnit framework, which makes writing test cases much easier.
Links:
Note: when running jMock in Eclipse, the following error can occur when running test cases:
java.lang.SecurityException:
  class "org.hamcrest.TypeSafeMatcher"'s signer information
  does not match signer information of other classes in the
  same package
The solution is make sure the jMock libraries are included before the standard jUnit libraries in the build path.
Thursday, May 19, 2011
Free resources associated with web clients
Imagine we have the following problem. Resources are kept open for web clients as long as the clients are using them. When they leave, the resources have to be closed.
Technically, we can say as long as the HttpSession is alive in the web container, the resources are kept open. When the HttpSession is invalidated, we need to call a method that frees the resources.
A solution is to use the HttpSessionBindingListener to solve this problem.
The idea is to create a class that implements this interface. The unbound method contains or refers to the clean-up code. Whenever resources are opened, an instance of this class is created and saved to the corresponding session. When the session invalidates, which can happen by timeout, the web container automatically calls the method of the object in order to free open resources.
The class:
Use the HttpSession.setAttribute() method to save an instance of this class to the session.
Technically, we can say as long as the HttpSession is alive in the web container, the resources are kept open. When the HttpSession is invalidated, we need to call a method that frees the resources.
A solution is to use the HttpSessionBindingListener to solve this problem.
The idea is to create a class that implements this interface. The unbound method contains or refers to the clean-up code. Whenever resources are opened, an instance of this class is created and saved to the corresponding session. When the session invalidates, which can happen by timeout, the web container automatically calls the method of the object in order to free open resources.
The class:
package com.javaeenotes;

import javax.servlet.http.HttpSessionBindingEvent;
import javax.servlet.http.HttpSessionBindingListener;

public class Janitor implements HttpSessionBindingListener {

    public void valueBound(HttpSessionBindingEvent arg0) {
        ;
    }

    public void valueUnbound(HttpSessionBindingEvent arg0) {
        // Start some cleaning here.
    }
}
Use the HttpSession.setAttribute() method to save an instance of this class to the session.
Saturday, May 14, 2011
Creating a Modal Window page with Apache Wicket
This post aims to clarify creating a modal window with Apache Wicket. Before continuing, minimum basic knowledge about Apache Wicket is required. A modal window is a child window on top of the main window. The modal window requires the user to interact with it, before the user can return to the main window.
The application we're developing consists of two pages:
The main page defines and displays the content of a variable and it also has a link to open the modal window page.
The modal window page displays the content of the same variable. But when the modal window is closed, the variable is changed by the modal window page.
Let's start by creating the HTML-file of the main page.
This page defines the modal page with id "modal". The next line is the location where the content of the variable "passValue" is displayed. Finally, a link is defined that opens the modal window.
Next, the corresponding Java class:
The class file displays the content of "passValue" and creates the modal window class with its methods. Look carefully at the code and comments in the modal window methods. We can see that the passValueLabel is expected to change in the window close callback method. We can also see that the variable is actually changed using a setter in the close button callback method. This happens when the user clicks on the close button of the modal window. Finally, an AJAX link is defined and added to the page.
The second part is the modal window page:
The modal page only displays the content of the "passValue" variable. The variable is owned by the main page.
This class is pretty simple. The first parameter refers to the main page that created the modal window page. Go back, and look how the modal window page is constructed in the main page. The main page is casted and the variable is retrieved using the getter-method. The content is then displayed in the modal window page.
Now run the code and the main page will look like this:

After clicking the link, the modal window page is opened:

We can see the same variable is displayed in the modal window page. Now, we close the modal window page. Because of this event, the variable is changed as instructed in the callback code:

As expected, the variable is changed in the main window.
The application we're developing consists of two pages:
- The main page (LaunchPage.java and LaunchPage.html)
- The modal window page (ModalContentPage.java and ModalWContentPage.html)
The main page defines and displays the content of a variable and it also has a link to open the modal window page.
The modal window page displays the content of the same variable. But when the modal window is closed, the variable is changed by the modal window page.
Let's start by creating the HTML-file of the main page.
<html>
<head>
<title>Launch Page</title>
</head>
<body>
<div wicket:id="modal"></div>
<span wicket:id="passValueLabel">Value of passValue variable.</span>
<a wicket:id="showModalLink">Open modal window.</a>
</body>
</html>
This page defines the modal page with id "modal". The next line is the location where the content of the variable "passValue" is displayed. Finally, a link is defined that opens the modal window.
Next, the corresponding Java class:
package com.javaeenotes;

import org.apache.wicket.Page;
import org.apache.wicket.ajax.AjaxRequestTarget;
import org.apache.wicket.ajax.markup.html.AjaxLink;
import org.apache.wicket.extensions.ajax.markup.html.modal.ModalWindow;
import org.apache.wicket.markup.html.WebPage;
import org.apache.wicket.markup.html.basic.Label;
import org.apache.wicket.model.PropertyModel;

public class LaunchPage extends WebPage {

    private String passValue;

    @SuppressWarnings("serial")
    public LaunchPage() {

        passValue = "This value is passed to the modal window.";

        // Display the current content of the passValue variable. The
        // PropertyModel must be used, as the value can be changed.
        final Label passValueLabel;
        add(passValueLabel = new Label("passValueLabel",
                new PropertyModel<String>(this, "passValue")));
        passValueLabel.setOutputMarkupId(true);

        // Create the modal window.
        final ModalWindow modal;
        add(modal = new ModalWindow("modal"));
        modal.setCookieName("modal-1");

        modal.setPageCreator(new ModalWindow.PageCreator() {
            public Page createPage() {
                // Use this constructor to pass a reference of this page.
                return new ModalContentPage(LaunchPage.this.getPageReference(),
                        modal);
            }
        });
        modal.setWindowClosedCallback(new ModalWindow.WindowClosedCallback() {
            public void onClose(AjaxRequestTarget target) {
                // The variable passValue might be changed by the modal window.
                // We need this to update the view of this page.
                target.add(passValueLabel);
            }
        });
        modal.setCloseButtonCallback(new ModalWindow.CloseButtonCallback() {
            public boolean onCloseButtonClicked(AjaxRequestTarget target) {
                // Change the passValue variable when modal window is closed.
                setPassValue("Modal window is closed by user.");
                return true;
            }
        });

        // Add the link that opens the modal window.
        add(new AjaxLink<Void>("showModalLink") {
            @Override
            public void onClick(AjaxRequestTarget target) {
                modal.show(target);
            }
        });
    }

    public String getPassValue() {
        return passValue;
    }

    public void setPassValue(String passValue) {
        this.passValue = passValue;
    }
}
The class file displays the content of "passValue" and creates the modal window class with its methods. Look carefully at the code and comments in the modal window methods. We can see that the passValueLabel is expected to change in the window close callback method. We can also see that the variable is actually changed using a setter in the close button callback method. This happens when the user clicks on the close button of the modal window. Finally, an AJAX link is defined and added to the page.
The second part is the modal window page:
<html>
<head>
<title>Modal Content Page</title>
</head>
<body>
<span wicket:id="passValueLabel">Current content of passValue variable.</span>
</body>
</html>
The modal page only displays the content of the "passValue" variable. The variable is owned by the main page.
package com.javaeenotes;

import org.apache.wicket.PageReference;
import org.apache.wicket.extensions.ajax.markup.html.modal.ModalWindow;
import org.apache.wicket.markup.html.WebPage;
import org.apache.wicket.markup.html.basic.Label;

public class ModalContentPage extends WebPage {

    public ModalContentPage(final PageReference modalWindowPage,
            final ModalWindow window) {

        // Retrieve the passValue content for display.
        String passValue = ((LaunchPage) modalWindowPage.getPage())
                .getPassValue();
        add(new Label("passValueLabel", passValue));

        // You can use the
        // ((LaunchPage)modalWindowPage.getPage()).setPassValue() method to
        // change the passValue variable of the launch/caller page.
    }
}
This class is pretty simple. The first parameter refers to the main page that created the modal window page. Go back, and look how the modal window page is constructed in the main page. The main page is casted and the variable is retrieved using the getter-method. The content is then displayed in the modal window page.
Now run the code and the main page will look like this:

After clicking the link, the modal window page is opened:

We can see the same variable is displayed in the modal window page. Now, we close the modal window page. Because of this event, the variable is changed as instructed in the callback code:

As expected, the variable is changed in the main window.
Thursday, May 12, 2011
Java Practices
A came across a very nice site with a collection of best practices in Java development:
http://www.javapractices.com
Definitely worth a read!
http://www.javapractices.com
Definitely worth a read!
Wednesday, April 20, 2011
Unnecessary Code Detector (UCD)
I'm currently working on a couple of years old Spring-based Java application. The application is developed and extended by multiple developers, which is clearly visible in the code. I'm responsible for a feature change that is going to have a big impact on the code.
An important step before implementing the new feature, is to refactor the relevant parts of the application in order to make the change easier to implement (and more understandable).
I noticed that parts of the code or modules are probably not used anymore. To make the refactoring process easier and more effective, it's probably a good idea to locate and remove dead code. Refactoring dead code is a waste of energy! I've found an Eclipse plugin in the Eclipse Marketplace called Unnecessary Code Detector, which helps me locating dead code.
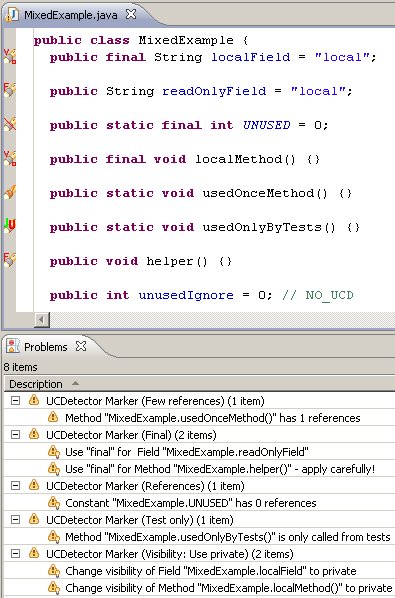
A first run of UCD results in a bunch of markers on code locations, where UCD thinks the code is unused. It also places markers on locations where the "visibility" of variables and methods could be improved.
The tool enables me to quickly find classes and methods with no references. I always do a double check with a "text find" on the whole project, to make sure the code is really not used. Because I'm using Spring, some of the classes are only referenced and used in the XML file. This type of reference is not detected by UCD, and it results in false positives. I annotate these locations with @SuppressWarnings("ucd"), which will stop UCD from marking them as unused code in the future.
In my opinion, Unnecessary Code Detector is a very valuable tool for the Java Developer. Give it a try!

An important step before implementing the new feature, is to refactor the relevant parts of the application in order to make the change easier to implement (and more understandable).
I noticed that parts of the code or modules are probably not used anymore. To make the refactoring process easier and more effective, it's probably a good idea to locate and remove dead code. Refactoring dead code is a waste of energy! I've found an Eclipse plugin in the Eclipse Marketplace called Unnecessary Code Detector, which helps me locating dead code.
A first run of UCD results in a bunch of markers on code locations, where UCD thinks the code is unused. It also places markers on locations where the "visibility" of variables and methods could be improved.
The tool enables me to quickly find classes and methods with no references. I always do a double check with a "text find" on the whole project, to make sure the code is really not used. Because I'm using Spring, some of the classes are only referenced and used in the XML file. This type of reference is not detected by UCD, and it results in false positives. I annotate these locations with @SuppressWarnings("ucd"), which will stop UCD from marking them as unused code in the future.
In my opinion, Unnecessary Code Detector is a very valuable tool for the Java Developer. Give it a try!
Sunday, April 17, 2011
Java Management Extensions (JMX) and Spring
The Java Management Extensions (JMX) API is a standard for managing and monitoring applications and services. We will skip all the theory, and go right into developing a JMX bean that is partly exposed to JMX. Using JMX tools we can manage and monitor the bean.
This blog post shows how to create a bean, which has a normal interface and a custom restrictive interface for JMX.
The Java interface below defines a class with three methods. The first two methods are setters and getters of an attribute.
Take this interface and develop a class with some extra methods.
Some of them are meant to be exposed to JMX, which means they can be monitored and manipulated. Now, define an interface to be used by JMX. The interface must follow the MBean conventions. This means we use getters and setters for attributes we want to expose. We leave out setters if we want to make the attribute read only. We also define operations for JMX.
Lastly, we configure all of this in a Spring beans XML file. We use the class MBeanExporter to expose our bean to JMX. We also tell it to use the restrictive MBean interface for our bean.
To get all of this working as a demonstration, we're going to use the following Main class.
Now, it's time to run this in our IDE. Or you can export it as runnable JAR, but make sure you place the beans.xml file in the same directory as the JAR-file.
After we run it, we're going to use the jconsole tool to lookup our bean. The tool can be found in the bin directory of your JDK installation directory. The screen below is presented to us, after we fire up jconsole.

Select our Main class and click on Connect, which will take us to the overview screen. Now select the MBeans tab, to find our bean.

Browse the directory tree to get the details of our bean. We can use it to view the values of the variables. We can even call the exposed methods of the bean. Try it!
This is a very, very short tutorial to get it working. Please use the following links to get more detailed information about JMX.
This blog post shows how to create a bean, which has a normal interface and a custom restrictive interface for JMX.
The Java interface below defines a class with three methods. The first two methods are setters and getters of an attribute.
package com.javaeenotes;

public interface Example {
    public String getAttribute();

    public void setAttribute(String s);

    public void hiddenOperation();
}
Take this interface and develop a class with some extra methods.
package com.javaeenotes;

public class ExampleImpl implements ExampleMBean, Example {
    private String attribute = null;
    private int attribute1 = 0;
    private String attribute2 = null;

    // Not exposed to JMX.
    public String getAttribute() {
        return attribute;
    }

    // Not exposed to JMX.
    public void setAttribute(String s) {
        attribute = s;
    }

    // Exposed to JMX.
    public int getExampleAttribute1() {
        return attribute1;
    }

    // Not exposed to JMX.
    public void setExampleAttribute1(int i) {
        attribute1 = i;
    }

    // Exposed to JMX.
    public String getExampleAttribute2() {
        return attribute2;
    }

    // Exposed to JMX.
    public void setExampleAttribute2(String s) {
        attribute2 = s;
    }

    // Not exposed to JMX.
    public void hiddenOperation() {
        ;
    }

    // Exposed to JMX.
    public void operation() {
        ;
    }
}
Some of them are meant to be exposed to JMX, which means they can be monitored and manipulated. Now, define an interface to be used by JMX. The interface must follow the MBean conventions. This means we use getters and setters for attributes we want to expose. We leave out setters if we want to make the attribute read only. We also define operations for JMX.
package com.javaeenotes;

public interface ExampleMBean {
    public int getExampleAttribute1();

    public String getExampleAttribute2();

    public void setExampleAttribute2(String s);

    public void operation();
}
Lastly, we configure all of this in a Spring beans XML file. We use the class MBeanExporter to expose our bean to JMX. We also tell it to use the restrictive MBean interface for our bean.
<?xml version="1.0" encoding="UTF-8"?>
<beans xmlns="http://www.springframework.org/schema/beans"
  xmlns:xsi="http://www.w3.org/2001/XMLSchema-instance"
  xsi:schemaLocation="http://www.springframework.org/schema/beans
  http://www.springframework.org/schema/beans/spring-beans-2.5.xsd">

  <bean id="exporter" class="org.springframework.jmx.export.MBeanExporter">
    <property name="beans">
      <map>
        <entry key="com.javaeenotes:name=exampleBean" value-ref="exampleBean" />
      </map>
    </property>
    <property name="assembler">
      <bean
        class="org.springframework.jmx.export.assembler.InterfaceBasedMBeanInfoAssembler">
        <property name="managedInterfaces">
          <value>com.javaeenotes.ExampleMBean</value>
        </property>
      </bean>
    </property>
    <property name="autodetectModeName" value="AUTODETECT_MBEAN" />
  </bean>

  <bean id="exampleBean" class="com.javaeenotes.ExampleImpl">
    <property name="exampleAttribute2" value="a value" />
  </bean>
</beans>
To get all of this working as a demonstration, we're going to use the following Main class.
package com.javaeenotes;

import org.springframework.context.support.ClassPathXmlApplicationContext;

public class Main {

    public static void main(String[] args) {
        new ClassPathXmlApplicationContext(new String[] { "beans.xml" });

        try {
            Thread.sleep(10000 * 100);
        } catch (InterruptedException e) {
            e.printStackTrace();
        }
    }
}
Now, it's time to run this in our IDE. Or you can export it as runnable JAR, but make sure you place the beans.xml file in the same directory as the JAR-file.
After we run it, we're going to use the jconsole tool to lookup our bean. The tool can be found in the bin directory of your JDK installation directory. The screen below is presented to us, after we fire up jconsole.

Select our Main class and click on Connect, which will take us to the overview screen. Now select the MBeans tab, to find our bean.

Browse the directory tree to get the details of our bean. We can use it to view the values of the variables. We can even call the exposed methods of the bean. Try it!
This is a very, very short tutorial to get it working. Please use the following links to get more detailed information about JMX.
Subscribe to:
Posts (Atom)