In this tutorial, we're going to secure the web service created in previous blogposts. If you don't have done that already, please go through the previous two blogposts, because this blogpost will build on the web service created there. We're using container managed security to achieve security. The tutorial consists of three parts. In the first part, we will implement BASIC authentication. In the second part we extend BASIC authentication with Secure Socket Layer (SSL). In the third part, we replace BASIC authentication with mutual authentication using certificates.
PART 1: BASIC authenticationSteps:
- Create realm users
- Modify server application for BASIC authentication
- Modify client application for BASIC authentication
1. Create realm usersIn this step we're creating users that are authorized to use the web service. The steps described here are only applicable for the Glassfish application server. I will describe the steps needed for the JBoss application server in a future blogpost.
First, make sure Glassfish is running, and go to the admin console or interface. Use the menu tree on the left to browse to:
Security -> Realm -> file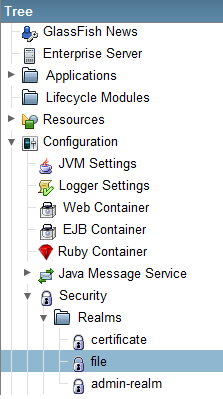
Now in the next screen, click on "Manage Users".
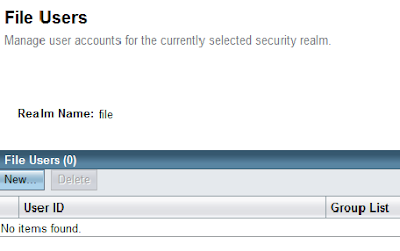
This will take you to the screen "File Users". Click on "New..." to create a new user. In this example, create an user "peter" in the group "wsusers". The password is "qwerty1".

Finally, click "Finish". Now, we have completed creating an user in Glassfish.
2. Modify server application for BASIC authenticationIn this step, we have to modify two files:
web.xml and
sun-web.xml. If you don't have these files, just create them under the
WEB-INF directory. In the
web.xml file, we protect the web service by adding: a security constraint, login configuration, and roles. To do this, we add the following code directly nested in
<web-app>:
<!-- Security constraint for resource only accessible to role -->
<security-constraint>
  <display-name>WebServiceSecurity</display-name>

  <web-resource-collection>
    <web-resource-name>Authorized users only</web-resource-name>
    <url-pattern>/ExampleWSService</url-pattern>
    <http-method>POST</http-method>
  </web-resource-collection>

  <auth-constraint>
    <role-name>user</role-name>
  </auth-constraint>

</security-constraint>

<!-- BASIC authorization -->
<login-config>
  <auth-method>BASIC</auth-method>
</login-config>

<!-- Definition of role -->
<security-role>
  <role-name>user</role-name>
</security-role>
In the file
sun-web.xml, we map the user group created in the application server to the role "user". Put the following code directly under
<sun-web-app>:
<security-role-mapping>
  <role-name>user</role-name>
  <group-name>wsusers</group-name>
</security-role-mapping>
At this point, you can deploy the application and test it with the web service client. If correct, a 404-authorization error will be displayed when the client tries to connect to the web service.
3. Modify client application for BASIC authenticationIn this step, we're going to supply an username and password when connecting to a web service in the client. The altered
start() method in the file
WebServiceClient.java should look like this:
public void start() {
    // This statement is not needed when run in container.
    service = new ExampleWSService();
    ExampleWS port = service.getExampleWSPort();

    // Authentication
    BindingProvider bindProv = (BindingProvider) port;
    Map<String, Object> context = bindProv.getRequestContext();
    context.put("javax.xml.ws.security.auth.username", "peter");
    context.put("javax.xml.ws.security.auth.password", "qwerty1");

    System.out.println(port.greet("Peter"));
    System.out.println(port.multiply(3, 4));
}
If we run the client now, we notice that we can successfully connect to the web service without getting authorization errors.
PART 2: Implementing Secure Socket Layer (SSL)Now, we continue to add Transport Level Security (TLS) using SSL to encrypt the transportation channel. This will prevent eavesdropping and tampering communication data between client and server.
Steps:
- Export server certificate from server keystore
- Create client truststore and import server certificate
- Modify server application for SSL
- Modify client application for SSL
1. Export server certificate from server keystoreOpen a command prompt and navigate to the root directory of the client. Create a new directory called "server" with the command "mkdir server" and navigate into it. This will be our working directory when manipulating the server keystore/truststore. Copy the following files from the
Glassfish_installation/domains/domain1/config directory to the newly created server directory:
cacerts.jks (truststore) and
keystore.jks (keystore).
Now, we can use the keytool to export the server certificate from the server keystore using the default store password "changeit":
keytool -export -alias s1as -keystore keystore.jks
        -storepass changeit -file server.cer
The exported server certificate is now written to the file
server.cer.
2. Create client truststore and import server certificateThe next step is to create the client truststore and import the server certificate to it. Create a "client" directory in the root directory of the client, and navigate to it using the command prompt. Now use the keytool to create the client truststore and import the server certificate:
keytool -import -v -trustcacerts -alias s1as -keypass changeit
        -file ../server/server.cer -keystore client_cacerts.jks
        -storepass changeit
When prompted to trust the certificate, type "yes" and press enter to accept.
3. Modify server application for SSLAdd the following code under the
<security-constraint>-element in
web.xml to enable SSL:
<user-data-constraint>
  <transport-guarantee>CONFIDENTIAL</transport-guarantee>
</user-data-constraint>
When you run the client now, you'll get a 302-error, indicating that the resource has moved.
4. Modify client application for SSLEdit
ExampleWSService.java (generated by
wsimport) and lookup the WSDL-URL in the code. Replace the URL with:
https://localhost:8181/webservice/ExampleWSService?wsdl
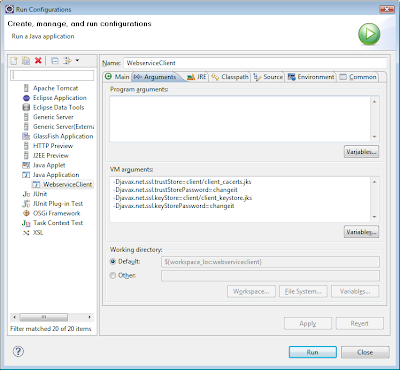
Save and use the following VM parameters to run the client:
-Djavax.net.ssl.trustStore=client/client_cacerts.jks
-Djavax.net.ssl.trustStorePassword=changeit
You can configure the VM parameters in Eclipse here:
Run -> Run Configurations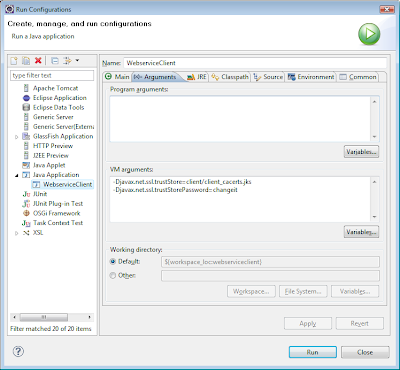 PART 3: Mutual authentication
In the final part, we're replacing the BASIC authentication with mutual authentication with certificates.
Steps:
- Create client keystore
- Export client certificate
- Import client certificate into server truststore
- Modify server application for mutual authentication
- Modify client application for mutual authentication
- Configure Glassfish for mutual authentication
1. Create client keystoreNow, create a client keystore to store its own certificate.
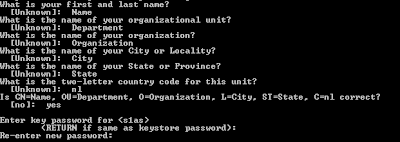
keytool -genkey -alias client -keypass changeit
        -storepass changeit -keystore client_keystore.jks
Use the following values to answer questions when prompted:
 2. Export client certificate
Navigate to the "client" directory with the command prompt. The client certificate is needed on the server side. So we need to export it from the client keystore using the following command:
keytool -export -alias client -keystore client_keystore.jks
        -storepass changeit -file client.cer
3. Import client certificate into server truststoreNavigate to the "server" directory and import the client certificate with the command:
keytool -import -v -trustcacerts -alias client
        -keystore cacerts.jks -keypass changeit
        -file ../client/client.cer
Use the default password "changeit" when asked, and finally type "yes" to accept the certificate.
4. Modify server application for mutual authenticationThe file
web.xml has to be changed for mutual authentication configuration. Lookup the
<auth-method>-element and replace
BASIC with
CLIENT-CERT.
The
sun-web.xml file has also to be modified. Instead of mapping the role to a realm group, we have to map the role to a certificate with the
<principal-name>-element:
<sun-web-app>
  <security-role-mapping>
    <role-name>user</role-name>
      <!-- <group-name>wsusers</group-name> -->
    <principal-name>CN=Name, OU=Department,
     O=Organization, L=City, ST=State,
     C=nl</principal-name>
  </security-role-mapping>
</sun-web-app>
5. Modify client application for mutual authenticationThe username and password we used in the client code for part 1 are not used anymore. So we can remove that part.
The client is now finished, and can be run with the following VM-settings:
-Djavax.net.ssl.keyStore=client/client_keystore.jks
-Djavax.net.ssl.keyStorePassword=changeit
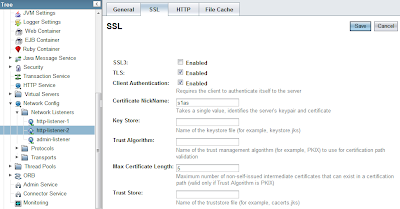
 6. Configure Glassfish for mutual authentication
If you experience connection problems when using the client, you're probably using the default Glassfish installation. By default, mutual authentication is disabled. To enable mutual authentication, go to:
Configuration -> Network Listeners -> http-listener-2. Click the
SSL tab. Make sure "SSL3" is not checked. The checkboxes "TLS" and "Client Authentication" should be checked.
Everything should be working now. In a future blogpost, I will show you how to configure realm users for JBoss.


